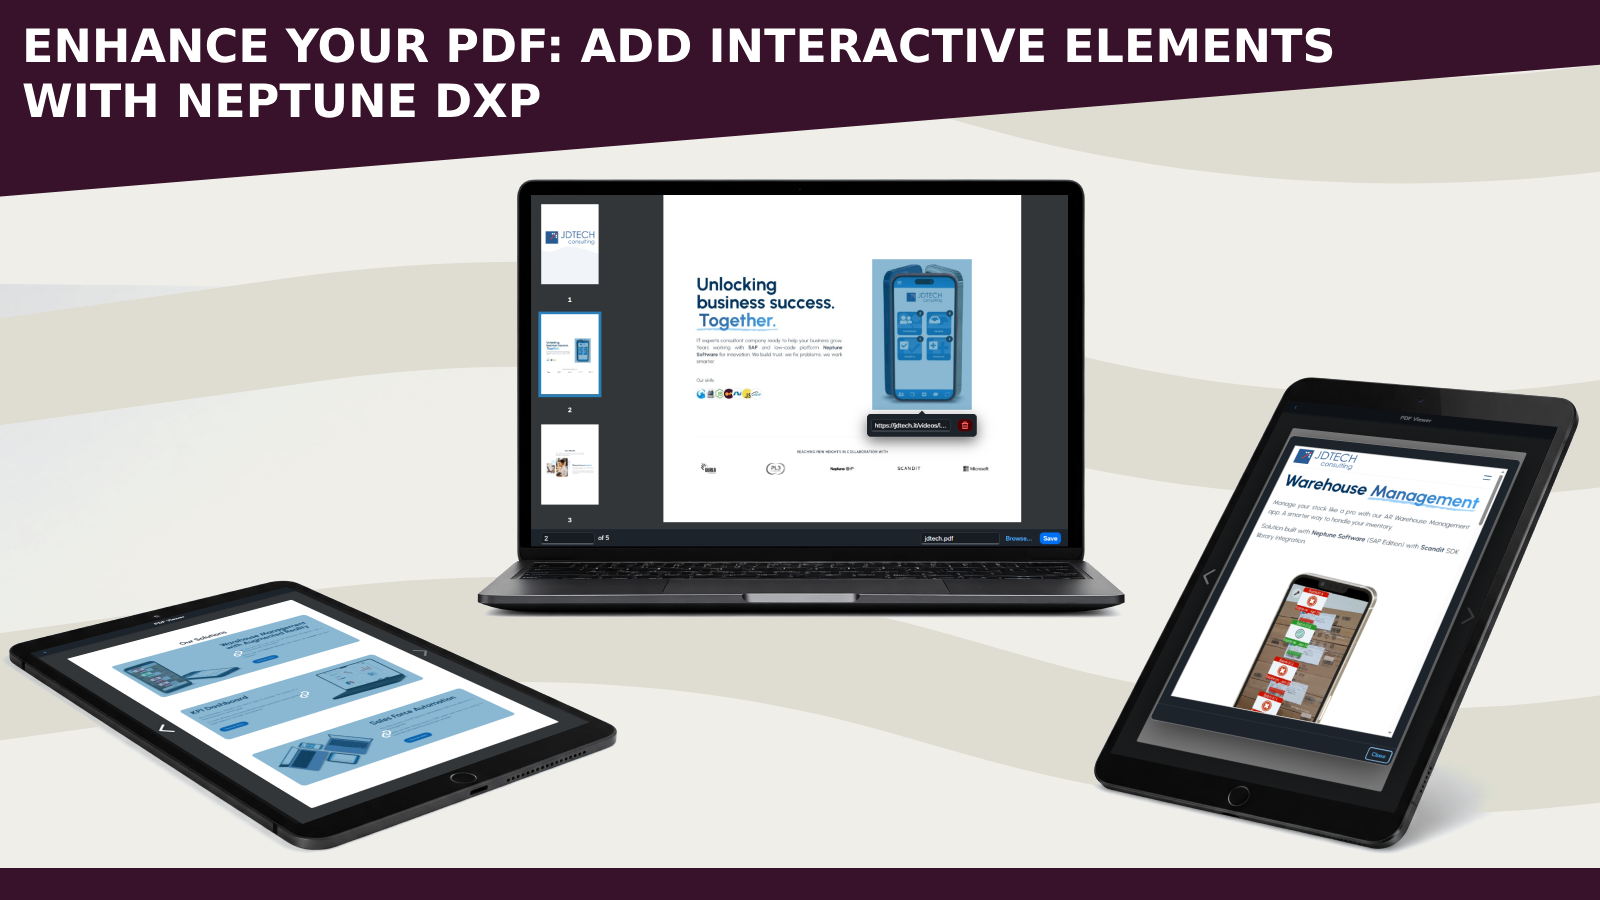
In Neptune DXP we have many ways to render a PDF document to an application, but it's time to make it interactive!
Today I want to share how I created in Neptune DXP a tool that allows the user to map with boxes the PDF pages, assigning them a custom value in order to perform custom actions on the click.
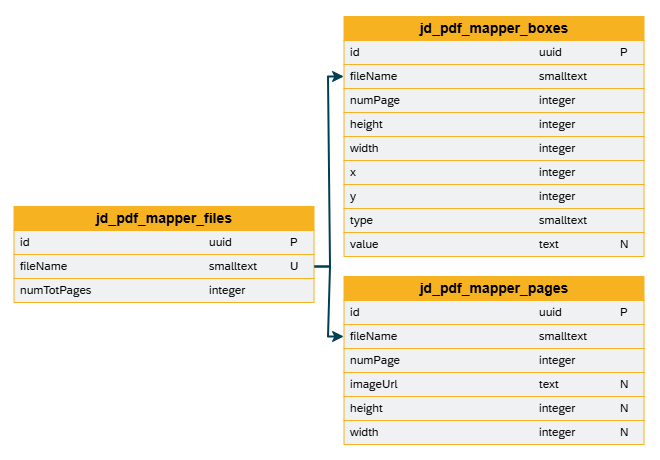
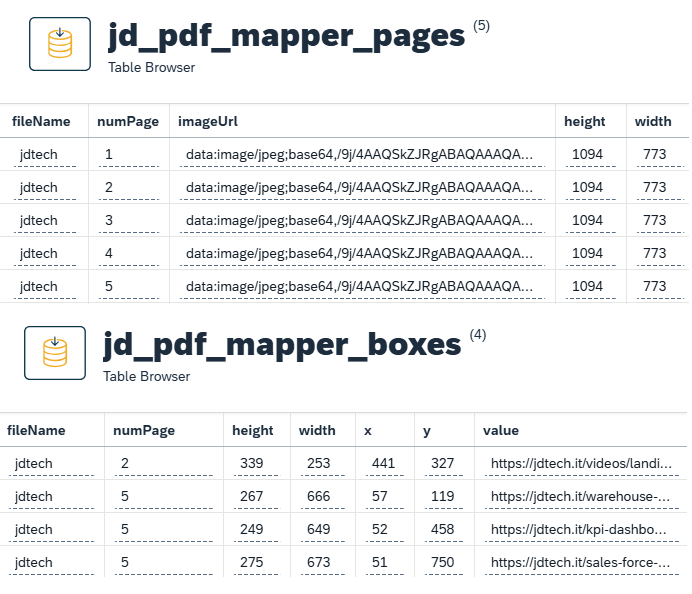
For this project I created three tables:
- jd_pdf_mapper_files containing some file header information
- jd_pdf_mapper_pages where all PDF pages are saved in base64 format
- jd_pdf_mapper_boxes storing all boxes drawn in the PDF file.
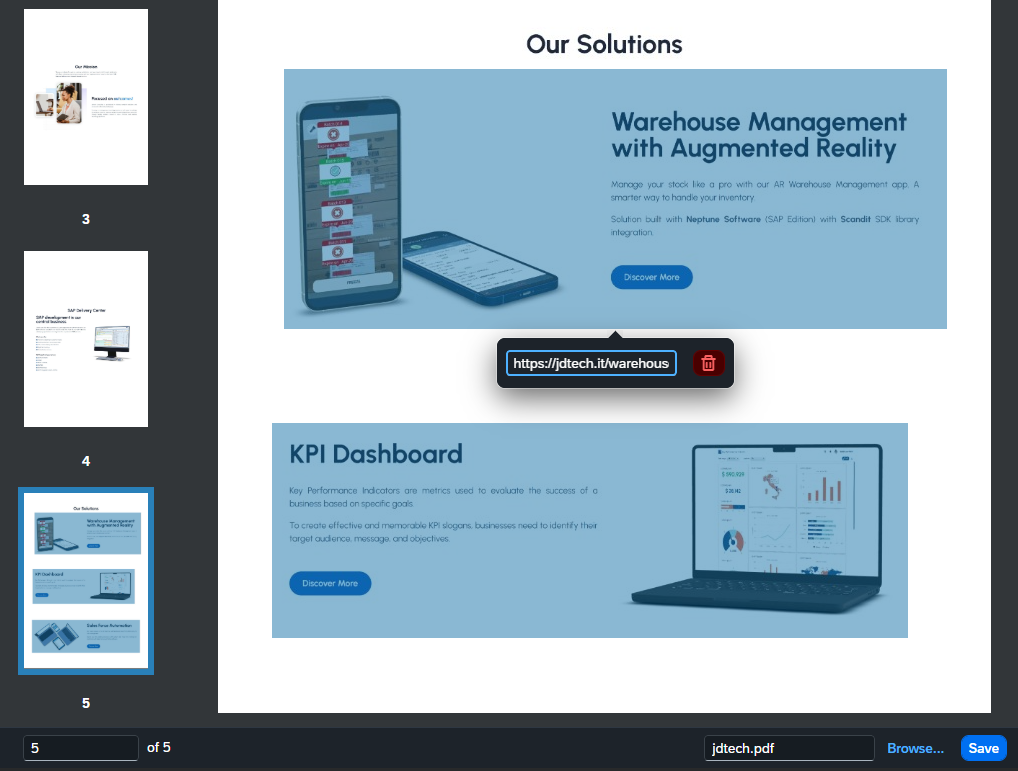
To allow the user to upload the PDF file and then draw the various boxes that will contain the different information I created a new application in Neptune.
It is mainly composed of two sap.m.List:
- the first containing the thumbnails of each page present in the PDF file
- the second showing the list of pages in their original size and allowing the user to create, edit, or delete the boxes.
When the user uploads the file, using the PDF.js library I retrieve the pages present in the file.
return pdfPage.render({
    canvasContext: canvas.getContext("2d"),
    viewport: pdfPage.getViewport({
        scale
    })
}).promise.then(function () {
    return canvas;
});
Then, by generating a canvas, I am able to transform the pages into images in base64 format.
pdfPagesData.push({
    imageUrl: canvas.toDataURL("image/jpeg", 0.9),
    pageNumber: pageNumber,
    width: canvas.width,
    height: canvas.height,
});
For each generated image, I also create a div that works as a drawing layer.
<div class='annotationLayer'></div>
In this layer I add the mousedown and mousemove events, which allow me to render new boxes based on the user's activity.
annotationLayer.addEventListener("mousedown", (e) => {
    // create the annotation box element (div)
    appContext.annotationBoxAdd = document.createElement("div");
    appContext.annotationBoxAdd.classList.add("annotationBox");

    // assign a starting width, height, top and left css property to the annotation box
    appContext.annotationBoxAdd.style.width = "0px";
    appContext.annotationBoxAdd.style.height = "0px";
    appContext.annotationBoxAdd.style.top = appContext.annotationStartY.toString() + "px";
    appContext.annotationBoxAdd.style.left = appContext.annotationStartX.toString() + "px";

    // append the annotation box div element to the pdf page
    e.target.appendChild(appContext.annotationBoxAdd);
});

annotationLayer.addEventListener("mousemove", (e) => {
    // save the end X and end Y fields to a variable (they can changes based on the mouse movement)
    appContext.annotationEndX = e.offsetX;
    appContext.annotationEndY = e.offsetY;

    // get selected page number and update the width and height annotation box css properties (the size of the annotation box)
    appContext.annotationBoxAdd.style.width =
        Math.abs(appContext.annotationEndX - appContext.annotationStartX) + "px";
    appContext.annotationBoxAdd.style.height =
        Math.abs(appContext.annotationEndY - appContext.annotationStartY) + "px";
});

When the user saves the work done on the PDF, the data is stored in the Neptune tables. The jd_pdf_mapper_boxes table contains information related to the boxes, such as width, height, and the x and y coordinates.
To make the PDF interactive I created a second app, where the images previously saved in the Neptune tables are rendered.
Also here we have a div element for each image (annotationLayer), that is populated with the boxes drawn in the PDF Mapper. For each box I add a click event to open a custom dialog based on its type.
newAnnotation.addEventListener("click", function (e) {
    // get the clicked annotation type and value
    const annotationType = e.target.dataset["annotation_type"];
    const annotationValue = e.target.dataset["annotation_value"];
    if (annotationType === "V") {
        // video
        htmlVideo.setContent(`<video controls autoplay>
                <source src="${annotationValue}" type="video/mp4">
            </video>`);
        dialogVideo.open();
    }
});
To improve the user experience and make it clear to the user which area is clickable, we can add icons and a background that are visible for the first few seconds via an animation, using CSS.
.annotationBoxVideo:after {
    content: '\e14b';
}
.annotationBoxLink:after {
    content: '\e088';
}
div[class*="annotationBoxHighlight"]:after {
    font-family: sap-icons;
    font-size: 2.5rem;
    color: white;
    background: #0064a075;
    border-radius: 11px;
    display: flex;
    align-items: center;
    justify-content: center;
    height: 100%;
    opacity: 0;
}
.annotationBoxHighlightOn:after {
    animation: pulse-animation 2s infinite;
}
@keyframes pulse-animation {
    0% {
        opacity: 0;
    }
    50% {
        opacity: 1;
    }
    100% {
        opacity: 0;
    }
}
- The code can be improved and adapted to specific scenarios
- In addition to opening videos and websites, other actions can be performed when the boxes are clicked (adding a specific product to the cart, downloading an image, playing audio...)
Hope this helps
Happy coding!